
Thursday, 15 December 2016

TTL x SFMGS Snowflake Garland!
Hey there lovelies!
Sorry I have been so MIA recently, This time of year is always so hectic, and I have been super busy preparing for my Festive Crochet Workshop at Rugby Art Gallery tomorrow where we will be making lots of Christmas decorations! For full details see my Facebook page.
As I'm sure you've all seen on the WONDERFUL Miki from Set Free My Gypsy Soul's blog we've been collaborating on a super cute snowflake garland together using the brand new Paintbox Yarns!
Here is the pattern for my Puff Stitch Snowflake :

Check out Miki's blog for instructions on joining to make the garland and for her own snowflake pattern!
Sorry I have been so MIA recently, This time of year is always so hectic, and I have been super busy preparing for my Festive Crochet Workshop at Rugby Art Gallery tomorrow where we will be making lots of Christmas decorations! For full details see my Facebook page.
As I'm sure you've all seen on the WONDERFUL Miki from Set Free My Gypsy Soul's blog we've been collaborating on a super cute snowflake garland together using the brand new Paintbox Yarns!
Here is the pattern for my Puff Stitch Snowflake :

Materials needed :
5mm crochet
hook
Paintbox Yarns Aran in shade of your choice
Scissors
Yarn Needle
Pattern
Start with a magic ring, make a* puff stitch into centre of magic ring, chain 2* repeat from * to * until you have 6 puffs, pull tail to close, slst to top of first puff.
Paintbox Yarns Aran in shade of your choice
Scissors
Yarn Needle
Pattern
Start with a magic ring, make a* puff stitch into centre of magic ring, chain 2* repeat from * to * until you have 6 puffs, pull tail to close, slst to top of first puff.
Round 1 – slst into ch2 space between puffs
and make another puff stitch, ch3, *make puff stitch in next ch2 space then
ch3* repeat from * to * around. Slst to top of first puff.
Round 2 – Chain 5 slst into puff, chain 8, slst into puff, chain 5, slst into puff. Dc3 into chain 3 space, continue around. Slst into first puff.
Round 2 – Chain 5 slst into puff, chain 8, slst into puff, chain 5, slst into puff. Dc3 into chain 3 space, continue around. Slst into first puff.
Fatsen off
and weave in ends
Check out Miki's blog for instructions on joining to make the garland and for her own snowflake pattern!
Friday, 18 November 2016
Tutorial - Crochet Trim Boot Socks

This is a super easy and fast way of up-cycling a bring pair of boot socks, or even by crocheting on to a lovely new pair of woollies and making a beautiful handmade(ish) Christmas gift!
This really is so simple!
First you'll need some socks, preferably with a turn down cuff. I got mine from M&S but they are all over the place this time of year!

Then you will need to chose your yarn and hook. I used Drops Paris in Mustard with a 4mm hook. I wouldn't normally use such a small hook for an Aran weight yarn but it seems to work in this case. If you wanted a more lacey trim then just opt for a lighter weight yarn and a smaller crochet hook.
You will also need a pair of scissors and a darning needle for sewing in those pesky ends!

First, turn down your cuff and attach yarn through the sock wherever you wish to start. Make sure you are working on the right side of the cuff. so if your cuff isnt turned down you are working from the inside of the sock..

Start with one dc where you have attached the yarn then simply crochet 4tr, dc, 4tr around evenly spaced out! It's as simple as that.
They make great book socks, or even just pretty socks for chilling about the house!!

Make sure you tag your makes with #mythreadthelove so I can see them!
Have fun making them!
A x
Friday, 23 September 2016
Shell Stitch Bonnet Tutorial

Thread the Love Pixie Pom Bonnet

Materials needed :
1 x ball of Drops Paris 100% cotton Aran 50g
4.5mm crochet hook
Yarn needle
Scissors
Pom-Pom maker
Acrylic yarn DK - enough for a pom-pom

Chain 50, keeping quite a long tail which is useful for sewing up at the end.
In second chain from hook make one dc,

skip 2 sts, 5tr in next,

skip 2 sts, dc in next. Repeat to end of row.


Tr 2 more in same st

Skip 2 sts, 1dc in next (top of shell from previous row)

Continue to the end, When you get to the last stitch just make 3tr in last st (half shell)
Ch1, turn. Dc 1 in same stitch, skip 2 sts, 5htr in next.
Continue this pattern until you have 12 rows of shells. Do not fasten off.

Chain 27, htr in second ch from hook and each st along, slst to base, fasten off.

Attach yarn at opposite side

Chain 27, htr in second ch from hook + each stitch along, slst to base, fasten off.
Your work should now look like this

Sew in ends leaving the long tail from where you originally made your slip knot.

Fold your work in half ensuring the right side of your work is facing out. Using the long tail sew up the back of your work.

There you have your super cute, super easy shell stitch bonnet!!
At this point you could make a pom-pom and attach it at the top. I used a small clover pom pom maker and stylecraft special dk for a more 'pouffey' pom-pom.
Please do share your makes on instagram and tag them with #mythreadthelove so I can see them :)
Tuesday, 9 August 2016
Basic Granny Square Tutorial
You can now purchase my Granny Square Peplum Top on my Etsy store here so I thought I'd leave a quick and simple tutorial here showing you how to make the main structure of the top which is super easy! For this tutorial I won't use any abbreviations to make it a little simpler.
Materials needed -





Materials needed -
- Any hook (see the peplum top pattern here for which hook and yarn I used)
- Yarn
- Yarn needle
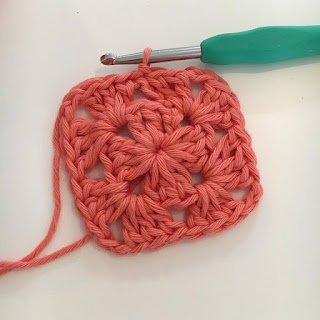
Start with a slip knot and chain 4, slip stitch into your first chain to create a ring,


Round 1 - chain 3 (counts as your first treble) then do 2 more trebles into the centre of the ring. chain 2 (makes a corner) then work 3 more trebles. chain two for a corner and make 3 more trebles. Continue until you have 4 corners. slip stitch to top of chain 3.

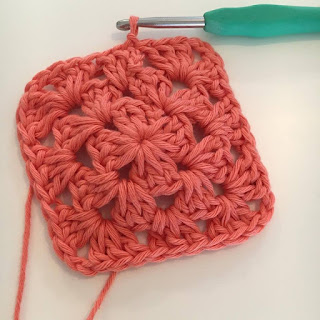
Round 2 - Chain 3 (counts as first treble) in chain 2 space (corner space) from previous round work 3 trebles, chain 2, 2 trebles all in same space. Then move on to the next corner space and do exactly the same. When you get to the last corner space work 3 trebles, chain 2, 2 trebles then slip stitch to top of chain 3.


Round 3 - Chain 3 (counts as first treble) work 2 more trebles into space below. Work 3 trebles straight into corner space, chain 2, 3 trebles in same space. work 3 trebles in next space, Only chain 2 inbetween trebles on a corner.


When you get to the last corner space, continue the pattern of 2 trebles, chain 2, 2 trebles then slip stitch to the top of chain 3 from previous round.


Continue this pattern for as many rounds as needed.

Amber x
Thursday, 4 August 2016
I am not a blogger! I repeat, I am not a blogger!!
Hello all! (anyone there?)
I am so useless at this blogging game, I just signed in for the first time since November. I know, terrible!
So I've been pretty busy since then, at home and with work. I have finally got my butt into gear and opened an Etsy store so you can now purchase my patterns via this link www.etsy.com/uk/shop/threadthelovedesigns but don't worry I'll still be popping a few free patterns on here too!
I'm also running some workshops at Rugby Art Gallery. There is a free 'drop in' session on the 6th August and 25th August where I will be sitting in on the current Sheila Bownas 'A life in pattern' exhibition, so you can come along and meet me, see what projects I'm currently working on and learn more about the workshops starting early next year.
I promise I will try to keep more up to date on here! You can follow me on twitter @threadthelove_ or on Instagram @threadthelove
Amber x
I am so useless at this blogging game, I just signed in for the first time since November. I know, terrible!
So I've been pretty busy since then, at home and with work. I have finally got my butt into gear and opened an Etsy store so you can now purchase my patterns via this link www.etsy.com/uk/shop/threadthelovedesigns but don't worry I'll still be popping a few free patterns on here too!
I'm also running some workshops at Rugby Art Gallery. There is a free 'drop in' session on the 6th August and 25th August where I will be sitting in on the current Sheila Bownas 'A life in pattern' exhibition, so you can come along and meet me, see what projects I'm currently working on and learn more about the workshops starting early next year.
I promise I will try to keep more up to date on here! You can follow me on twitter @threadthelove_ or on Instagram @threadthelove
Amber x
Monday, 23 November 2015
Mulled wine at the ready..
Kilner Jar Mug Cosy Pattern -
You will need :
6mm crochet hook
4mm crochet hook
Chunky weight yarn (I used stylecraft special chunky)
Aran or DK weight cotton yarn (I used Drops Paris)
Scissors
Wool needle
One large(ish) button
Start by taking your chunky yarn and your 6mm hook and chaining 10
Row 1 - Htr in second ch from hook and each st across, ch2 turn
Row 2 - Htr in back loop of each st accross
Repeat rows 1 & 2 alternately until you have 18 rows. Ch1 turn
Row 20 - dc in next 4sts, ch14, tr in 7th ch from hook, then tr in each stitch until your reach the bottom of the ch. Skip 2 sts, dc in next 4 sts.
Fasten off, weave in ends.
Now attach your cotton yarn and 4mm hook at any point along the short side making sure your ribs are facing you. dc in each stitch across, when you get to the longer edge dc in top of rib and tr 4 in the middle of htr , carry on this pattern until you reach the end of the long side.
dc in each stitch up until your button hole then dc 7 into the button hole, carry on making a dc in each stitch until your get to the long edge again then follow the pattern of dc in top of rib and tr 4 in the middle of htr. When you get back round to the start fasten off and weave in ends.
Wrap your cosy around your mug and mark where you want your button to go. Attach button here using cotton yarn.
This pattern is very easily adaptable to different sized mugs by changing the amount of chains on your foundation chain and the amount of rows you work. This pattern fits the Kilner Jar Mugs perfectly.
Please use #mythreadthelove when uploading your makes to Instagram! I love seeing the gallery fill up with all your creations!
Please do not republish this pattern or sell it. Thank you
(I'm sorry if none of this makes sense, I am totally sleep deprived, wine deprived and currently waiting on my dominoes order to arrive! Any questions just pop me an email or comment below and I will get back to you as soon as I can)
-A x
6mm crochet hook
4mm crochet hook
Chunky weight yarn (I used stylecraft special chunky)
Aran or DK weight cotton yarn (I used Drops Paris)
Scissors
Wool needle
One large(ish) button
Start by taking your chunky yarn and your 6mm hook and chaining 10
Row 1 - Htr in second ch from hook and each st across, ch2 turn
Row 2 - Htr in back loop of each st accross
Repeat rows 1 & 2 alternately until you have 18 rows. Ch1 turn
Row 20 - dc in next 4sts, ch14, tr in 7th ch from hook, then tr in each stitch until your reach the bottom of the ch. Skip 2 sts, dc in next 4 sts.
Fasten off, weave in ends.
Now attach your cotton yarn and 4mm hook at any point along the short side making sure your ribs are facing you. dc in each stitch across, when you get to the longer edge dc in top of rib and tr 4 in the middle of htr , carry on this pattern until you reach the end of the long side.
dc in each stitch up until your button hole then dc 7 into the button hole, carry on making a dc in each stitch until your get to the long edge again then follow the pattern of dc in top of rib and tr 4 in the middle of htr. When you get back round to the start fasten off and weave in ends.
Wrap your cosy around your mug and mark where you want your button to go. Attach button here using cotton yarn.
This pattern is very easily adaptable to different sized mugs by changing the amount of chains on your foundation chain and the amount of rows you work. This pattern fits the Kilner Jar Mugs perfectly.
Please use #mythreadthelove when uploading your makes to Instagram! I love seeing the gallery fill up with all your creations!
Please do not republish this pattern or sell it. Thank you
(I'm sorry if none of this makes sense, I am totally sleep deprived, wine deprived and currently waiting on my dominoes order to arrive! Any questions just pop me an email or comment below and I will get back to you as soon as I can)
-A x
Subscribe to:
Posts (Atom)